Virtualizing a Linux System (Creating a Linux VM P2V)

March 5th, 2011

This tutorial article is going to show you how to create a Linux virtual machine from a physical Linux system. These instructions are generic enough to work with any Linux distribution, such as Ubuntu, Fedora, Red Hat, CentOS, Debian, Mint, etc.

There are many reasons why you would create a VM of a physical system you have running. You might want to test out things before you try them on your actual system. It is useful when you are translating to have both the English and Japanese (or other language) OS and applications open side by side to reference the correct translations easily. Whatever the reason, this article will show you one way to do it pretty easily.

Overview of the Linux VM creation task:

Tools and Resources Needed

  • SystemRescueCd ISO file
  • Blank CD-ROM or USB disk
  • USB disk drive large enough to fit entire Linux system
  • VMware or VirtualBox

Preparation Tasks

  1. Make note of the disk partitioning
  2. Create a bootable Linux rescue disk

Main Tasks

  1. Image the hard drive partitions
  2. Create an empty Virtual Machine
  3. Recreate the hard drive partitions
  4. Restore the hard drive partitions
  5. Set up the boot loader

Final Task – Boot the VM

Optional Task – Configure X11

Preparation Tasks

Make Note of the Disk Partitioning

On the physical Linux system we want to virualize, run the df command to list the partitions and mount points

df -h

Make a note of the partitions, their sizes, and mount points. You will use this information later to recreate the disk partitioning in the virtual machine.

Create a Bootable Linux Rescue Disk

For the task of converting a physical Linux system to a virtual machine we are going to use another version of Linux to do the work in. Any bootable version of Linux will work, and I really like SystemRescueCd for this task. It is a light-weight Linux system that comes with all the system tools you’ll need for this job like partimage and fdisk (or GParted).

Download the SystemRescueCd ISO file.

Burn the ISO file to a CD-ROM, or follow the instructions to make a bootable USB stick.

Power down the physical Linux computer we are going to virtualize and put the SystemRescueCd in the CD-ROM drive or USB drive.

Turn the computer on and boot to SystemRescueCd Linux.

Main Tasks

Image the Hard Drive Partitions

Plug in your external USB hard drive.

Run the dmesg command to find the device name of the USB hard drive.

dmesg

Look for your hard drive name and description. For example, if you plugged in a Western Digital My Passport drive you should see something similar to this:

usb 2-1: Product: My Passport 070A
usb 2-1: Manufacturer: Western Digital
sd 4:0:0:0: [sdb] 1463775232 512-byte logical blocks: (749 GB/697 GiB)
sd 4:0:0:0: [sdb] Write Protect is off
sd 4:0:0:0: [sdb] Mode Sense: 23 00 10 00
sd 4:0:0:0: [sdb] Assuming drive cache: write through
sdb: sdb1

The key piece of information here is the sdb1 on the last line. This is the device name we will use to mount the USB hard drive.

Create a directory to mount the USB hard drive. For example, a new directory called flash.

mkdir /mnt/flash

Mount the USB hard drive, device sdb1, on the newly created directory.

mount /dev/sdb1 /mnt/flash

Run the partimage program to image the partitions.

partimage

Use the GUI to select the partition to image.

Press Tab and enter the file name for the partition. For example (Assuming the partitions are on device sda):

/mnt/flash/sda1.partimage.gz

Press F5 twice to navigate to the next screens and press OK to start the imaging process.

Repeat this process for each partition on the Linux system. Make sure to name the files appropriately.

Note: Partimage will also show the partitions of the USB drive you mounted. Do not image the partitions of your USB disk. Also, do not image any extended or swap partitions.

When you are finished imaging all of the disk partitions, unmount the USB disk drive.

umount /mnt/flash

Shut down SystemRescueCd and restart your Linux system.

reboot

Create an Empty Virtual Machine

Create a new VM in VMware (or VirtualBox).

Configure the VM to have similar hardware specifications as the physical Linux computer: RAM, processor, hard disk. It is important that the hard disk be the same size or larger than the physical machine so the partitions fit.

Set the VM to boot from the CD-ROM drive using the SystemRescueCd ISO file.

Boot the empty virtual machine into SystemRescueCd.

Recreate the Hard Drive Partitions

Run the fdisk command to find the hard drive device.

fdisk -l /dev/sda

If it is sda and your drive was around 100 GB, you will see something like this:

Disk /dev/sda: 105.2 GB, 105226698752 bytes

Use fdisk to recreate the disk partitions of the original physical Linux computer. You should have made note of these in the preparation tasks. fdisk is a command line program to partition the drive. (You can also use the GUI GParted program in X Windows if you prefer. Press startx and select GParted from the menu.)

fdisk /dev/sda

Press n to add new partitions.

Press a to toggle the bootable partition (the /boot partition).

Press t to toggle the swap partition by setting it to 82.

Press w to write changes to disk.

Press m at any time for a list of options.

Restore the Hard Drive Partitions

Plug in your external USB hard drive and connect it to the virtual machine.

Run the dmesg command to find the device name of the USB hard drive.

dmesg

Look for your hard drive name and description.

Create a directory to mount the USB hard drive. For example, a new directory called flash.

mkdir /mnt/flash

Mount the USB hard drive, for example device sdb1, on the newly created directory.

mount /dev/sdb1 /mnt/flash

Run the partimage program to restore the partitions.

partimage

Use the GUI to select the partition to restore.

Press Tab and enter the file name and location for the image file. For example:

/mnt/flash/sda1.partimage.gz

Press Tab and change the Action to be done to Restore partition from an image file.

Press F5 twice to navigate to the next screens and press OK to start the restore image process. In VMware you will probably have to press Function F5 to get the F5 key to work.

Repeat this process for each partition on the Linux system.

When you are finished imaging all of the disk partitions, unmount the USB disk drive.

umount /mnt/flash

Set Up the Boot Loader

The final step is to set up the boot loader and install it into the master boot record.

Mount the boot directory. For example, if sda1 is the boot partition and sda3 is the root partition.

mkdir /mnt/root
mount /dev/sda3 /mnt/root
mount /dev/sda1 /mnt/root/boot

Verify the configuration of the boot configuration file. Assuming you are using GRUB:

nano /mnt/root/boot/grub/device.map

Nano is a Linux text editor. You can also use pico or vi.

You want to verify that the device in the configuration file matches what it is in the VM. For example, if it says this:

(hd0) /dev/hda

You may need to change hda to sda. In this example we need to change it.

(hd0) /dev/sda

Exit Nano or whatever text editor you used.

Run grub-install to install GRUB into the MBR.

grub-install --root-directory=/mnt/root /dev/sda

Final Tasks

We’re all done. Now reboot in SystemRescueCd and your virtual machine should now boot into the same Linux setup that is on your physical machine.

reboot

This VM is now an exact copy of the physical Linux computer. You have successfully done a P2V (Physical to Virtual) conversion of your Linux system.

Optional Task – Configure X11

Depending on the version of Linux you are using, it may not be able to use the VMware settings to display X Windows properly. In that case, you will need to make a simple change to the X11Config file.

First, make a backup of the X11Config file. This assumes it is located in /etc/X11.

cp /etc/X11/XF86Config /etc/X11/XF86Config.backup2

Edit the X11Config file.

nano /etc/X11/XF86Config

Change the Driver and BoardName settings in the Device section from the VMware settings to a generic Vesa setting.

Section      "Device"
Identifier   "Videocard0"
Driver       "vesa"
VendorName   "Videocard vendor"
BoardName    "VESA driver (generic)"

Save the file and restart. You should be able to get X Windows to start now.

That’s it. It looks like a lot of steps, but it is not that difficult to do. The longest part is imaging and restoring the partitions.

Now that you have a virtual version of your Linux computer, you are able to do unique things like snapshots and work with multiple configurations or languages at the same time. This is really helpful when translating software from one language to another because you can now have both language versions running at the same time on the same desktop.

Italics in Japanese

February 27th, 2011

When translating a document with formatting, such as a Microsoft Word document, you can’t always use the original source-language formatting in the translated language as is. This is especially true of italic type in Japanese. What works in italics in English does not work in Japanese. The formatting must be changed.

The main reason for this is Japanese text can become nearly unreadable when set in italic type. This is especially the case on low resolution monitors when displaying kanji in bold, italic fonts.

When translating English into Japanese, it is best to change the formatting for text in Japanese that was originally in italic type in English.

Here is a mini style guide of recommendations of how to format Japanese text that was translated from English set in italic type.

Emphasis

Use a Gothic bold-face type, or write the word in katakana if appropriate.

正しいのは、わたしだけです。

Another way to show emphasis is to use a well-known English phrase and write it in katakana.

それはマジックに違いない。

Titles of Books, Publications, Media, etc.

Use the Japanese double quotation marks to quote the name of a publication.

『異星の客』は、アメリカの1961年に書いた小説である。

Foreign Words

In English these would be written in italics. In Japanese, they will be written in either katakana or romanized type, which serves the function of designating it a foreign word.

Introducing or Defining Terms

Use the Japanese single quotation marks.

「iPad」とは、タッチパネルを搭載したタブレット型端末である。

Other

In other instances where italics are used in English, it is usually safe to use the Japanese single quotation marks.

In general, it is best to avoid italic type in Japanese. Certain Japanese typefaces don’t even have an italic font to begin with. It is very important to thoroughly proofread documents translated into Japanese for these types of formatting issues. What is natural in English can produce something almost unreadable in Japanese. And it will be a lot more natural to use something other than italics.

This also works the other way around when translating from Japanese into English. Where quotation  marks and katakana etc. are used in Japanese should be changed into italics in the English translation where appropriate.

Using Wikipedia as a Translation Resource

February 21st, 2011

When you are translating something, sometimes there are words or phrases that just aren’t in the dictionary. A site like ALC is amazing for Japanese/English translations, but even ALC doesn’t have everything.

In those cases, I have found Wikipedia to be an excellent online resource for doing translations. Although a word or phrase might not be in the dictionary, there might be a Wikipedia article about it. And if there is a Wikipedia article in one language, it might have a translated version of that article in another language.

Using the Languages Sidebar to Find Translations

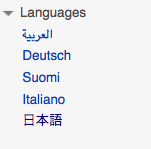
On the left-hand side of each Wikipedia article is a sidebar with lots of options. One of these options is for languages.

If there is a similar article in a the Japanese language Wikipedia, you will see the link for 日本語 to read the Japanese article.

For example, when translating manufacturing documents that deal with chemicals, you will often come across an MSDS (material safety data sheet). This type of phrase is usually not in the dictionary, but it has an established name in Japanese. To find the proper Japanese, just go to the English Wikipedia article for MSDS, and click on the link to the Japanese version of the article and you will see that it is 「化学物質安全性データシート」.

Lots of phrases that are difficult to look up in dictionaries may have a dedicated Wikipedia article that you can use to find the translated Wikipedia article, which will lead you to the correct translation.

Using Wikipedia to Better Understand How to Translate Something

Sometimes even Wikipedia doesn’t have translated articles of what you need to translate. This is often the case for something that is very unique to the source language you are translating.

An example of this I came across at work translating semiconductor maintenance procedures from Japanese to English is the Japanese phrase KY. It is often written in English just like that. In Japanese they often use English for certain things for them to stand out. In this case, however, I was stumped as to what this was—until I searched Japanese Wikipedia.

Japanese Wikipedia had an article linked from KY to the main article for 「危険予知訓練」. This made sense in the context of what I was translating. This was what KY meant: kiken yochi. Although there is no English article link to get the proper English translation (probably because we don’t use the phrase KY in English), there is enough of an explanation to understand what kiken yochi is and how to translate it. And, as luck would have it, the Japanese article has an English example of what kiken yochi is: tool box meeting.

After reading about kiken yochi and discussing it with others, we came up with pre-task planning as the translation we would use. Job hazard analysis is also a suitable translation for KY.

In the case of KY, Wikipedia did not have a direct link to a translated English article because the term KY is Japanese for kiken yochi, but it did provide enough explanation to be able to come up with an appropriate translation.

If you can’t find a translation for something, learn about it and come up with your own. Wikipedia is often a great resource to learn enough about something to be able to translate it when you come across a term or phrase that just isn’t in any dictionary.

Japanese Input on Fedora 14 Linux

February 20th, 2011

Fedora 14 is the quickest and easiest Linux distribution to get Japanese input working so you can type in Japanese. Fedora uses the IBus keyboard input method system and uses the Anthy Japanese input method for the Japanese keyboard input.

This short tutorial will show you step by step how to get Japanese IME setup on Fedora 14 in a few short minutes. There is noting to install—just a few menus to navigate and you are all set up to type in Japanese.

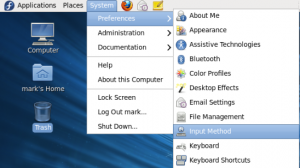
To start, select from the top panel SystemPreferencesInput Method


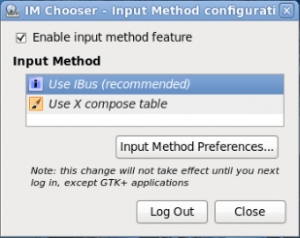
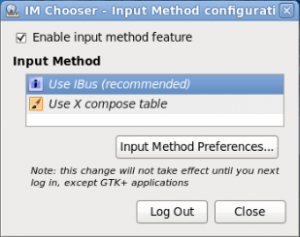
On the IM Chooser – Input Method configuration screen, click the check box to Enable input method feature.

Then click the Input Method Preferences… button.

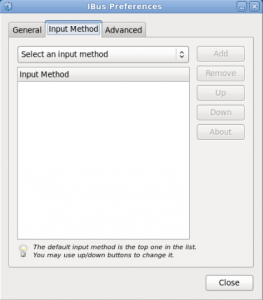
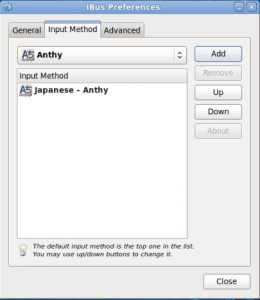
On the IBus Preferences screen, select the Input Method tab.

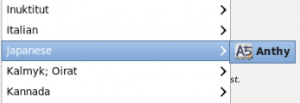
Press the Select an input method drop down and scroll down to select JapaneseAnthy.

Press the Add button to add Anthy as the Japanese input method.

Press the Close button on the IBus Preferences screen.

Press the Log Out button on the IM Chooser – Input Method configuration screen.

Press Log Out on the Log Out popup window to log out of Fedora.

Log back in to have the new Japanese input method changes take effect.

You will now have the IBus input method framework button on the Gnome top panel. This is the button to change input modes. Open a text editor such as gedit or some other application with a text input window.

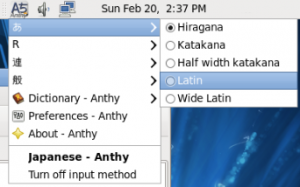
Press the IBus input method framework button and select Japanese – Anthy.

The keyboard icon has now changed to Aち, which shows the letter A and the hiragana character chi, which probably is trying to get something close the the pronunciation of Anthy while indicating Japanese/English input modes.

You should now be able to type in Japanese.

Use the Anthy Aち button to toggle between Japanese, English, and other Japanese IME modes.

That’s it. Now you can type in Japanese, as well as quickly toggle between English and Japanese on the fly in Fedora. As an added convenience, the IBus input method remembers individual preferences per application. So if you are typing Japanese in gedit, but writing an email in English in Firefox, you can switch between the applications and IBus will give you the correct input method that you last used in that application.

Sorting in Japanese — An Unsolved Problem

February 13th, 2011

Sorting Japanese is not only difficult—it’s an unsolved problem. This seems hard to believe if you are not familiar with the complexities of processing Japanese digitally. But what is trivially easy in English is impossible in Japanese, even with the amount of computer power we have available today.

The problem comes from the complex nature of written Japanese. Contrast it with English, which only has 26 letters: a comes before b; b comes before c; and so on. On the other hand, Japanese not only has thousands of characters, it also has four different kinds of written characters. But this is only the beginning of the difficulty. The unique nature of kanji characters and their associated pronunciations is the language feature that makes Japanese unsortable.

Let’s work our way through the complexities to understand why Japanese cannot be sorted.

A Simple Sort

Let’s do a simple sort of a list of English words. Here I have a list of characters from the video game Street Fighter.

  • Ryu
  • Ken
  • Chun Li
  • Yun

Let’s put this list through a simple sort function using PHP.

<?php
   $names = array (“Ryu”, “Ken”, “Chun-Li”, “Yun”);
   sort ($names);

   foreach ($names as $name) {
      echo “$name<br/>”;
   }
?>

Here is the result:

  • Chun Li
  • Ken
  • Ryu
  • Yun

This is the result we expect—it’s in alphabetical order. A computer can easily sort English in alphabetical order because there are simple rules. C comes before K; K comes before R; and R comes before Y. You should have learned this in the first grade.

Now let’s start looking at the complexities of Japanese, and see why sorting does not work as easily.

Multiple Character Sets

Japanese has four different character sets in the written language. Don’t worry about why there are four different types of characters, just know that there are.

  • Hiragana alphabet — ひらがな
  • Katakana alphabet — カタカナ
  • Kanji characters — 漢字
  • ABC alphabet — abc

Here is where the difficulty comes in: each character set has characters with the same pronunciations as characters in the other sets. On top of that, all four character sets are written together to form what is modern written Japanese. If you only had to deal with one character set at a time (ignoring kanji for the moment, we will get to that later), you could sort Japanese automatically just like English. Hiragana sorts just fine; katakana sorts just fine; and the ABC alphabet sorts just fine. But, in combination, it is not clear how you would sort these.

I should note that there are two different alphabetical sorting orders in Japanese. For this article I am going to use the a i u e o (あいうえお) sort order.

Sorting Settings

Now let’s look at an example of sorting mixed character sets. Again, using PHP.

<?php
   setlocale(LC_ALL, ‘jpn’);
   $settings = array (“システム”, “画面”, “Windows ファイウォール”,
      “インターネット オプション”,  “キーボード”, “メール”, “音声認識”, “管理ツール”,
      “自動更新”, “日付と時刻”, “タスク”, “プログラムの追加と削除”, “フォント”,
      “電源オプション”, “マウス”, “地域と言語オプション”, “電話とモデムのオプション”,
      “Java”, “NVIDIA”);
   sort ($settings);

   foreach ($settings as $setting) {
      echo “$setting<br/>”;
   }
?>

Here is the result.

  • Java
  • NVIDIA
  • Windows ファイアウォール
  • インターネット オプション
  • キーボード
  • システム
  • タスク
  • フォント
  • プログラムの追加と削除
  • マウス
  • メール
  • 地域と言語のオプション
  • 日付と時刻
  • 画面
  • 管理ツール
  • 自動更新
  • 電源オプション
  • 電話とモデムのオプション
  • 音声認識

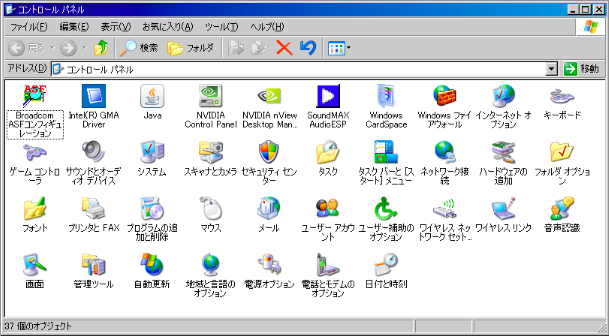
Take a look at what happened with this sort. The first three strings start with characters of the alphabet, and were sorted as we expect. The next eight strings are in katakana, and they are sorted correctly according to the Japanese a i u e o sort order. The rest of the strings all start with kanji and are not sorted in any way that makes sense to a human.

So what is going on here? In this case, it seems that PHP is using the character code to determine the sort order. This works fine with alphabets like English, or even the Japanese katakana, because the character codes go in order with the sort order. But the character codes do not go in order when mixed with other character sets. In this example you can see ABC and katakana are separated. Kanji are then separated from katakana. There were no hiragana in this list but they would do the same. Sort order by character code works fine for alphabets when the alphabets are by themselves. But once you mix alphabets together, you cannot have any sensible sorting order by doing it that way.

An observant reader might have noticed what these items in our list are: Control Panel items in Windows XP. It’s clear that PHP’s sort function can’t sort this properly. But what about Windows XP Japanese edition?

Microsoft seems to have the same problem. They do alright with sorting each character set individually. But they don’t seem to be able to integrate the character sets together like a Japanese user would expect. It’s OK, I don’t expect Microsoft to be able to solve such a hard problem.

Sorting Names

Let’s look at another example to show what happens when you have all four character sets sorted together. Here we have two names, both written four different ways—using each character set: ABC alphabet, hiragana, katakana, and kanji.

Ayumi、 あゆみ、アユミ、歩美

Tanaka、たなか、タナカ、田中

It is very possible to have different people with the same name write their name in different character sets. The traditional way of writing the Japanese name of Ayumi would be written in kanji; a modern, stylish way would be to write it in hiragana, and a second generation Japanese-American might write their name in katakana or the alphabet.

Put these names into the same PHP sort function and look what happens.

<?php
   setlocale(LC_ALL, ‘jpn’);
   $names = array (“Ayumi”, “アユミ”, “あゆみ”,  “歩美”,  
   “Tanaka”, “タナカ”,  “たなか”, “田中”);
   sort ($names);

   foreach ($names as $name) {
      echo “$name<br/>”;
   }
?>

Here is the result:

  • Ayumi
  • Tanaka
  • あゆみ (Ayumi)
  • たなか (Takana)
  • アユミ (Ayumi)
  • タナカ (Tanaka)
  • 歩美 (Ayumi)
  • 田中 (Tanaka)

Within each character set Ayumi is sorted before Tanaka, which is correct for the ABC, hiragana, and katakana alphabets. The kanji pair had a 50/50 chance of being right. But as you can see, the different character sets are not integrated together. If these were all names in your phone’s contact list or your Facebook friends list, you would expect all of the Ayumis and Tanakas to be listed together.

The ABC, hiragana, and katakana alphabets can be sorted—although which character set of Ayumi gets sort preference is a whole other issue—once that preference is agreed upon, sorting can be done just as easily as English.

Kanji — The Real Problem

The real problem with sorting Japanese text is kanji. Kanji aren’t just difficult for students of Japanese to make sense of, they are literally impossible for computers to process with the same intelligence as a human. The reason for this is the following:

Kanji have multiple pronunciations, determined by the context in which it appears.

This fact keeps students up nights studying for years trying to remember how to pronounce kanji right. And it also makes our sorting problem extremely nontrivial. We sort things in language by the pronunciations. Up until now we were dealing with letters. ABC, hiragana, katakana—these are all letters which a single pronunciation. There is only one place they can go.

Kanji on the other hand all have multiple pronunciations. Some have over ten! Only from the context in which the kanji appears do you know how to pronounce it. Our simple sorting problem has now turned into a natural language processing problem.

Here is an example:

私は私立大学で勉強しています。

Here the kanji 私 is used in two different contexts. The first usage, is 私 (watashi). The second usage is part of the compound word 私立大学 (shiritsu daigaku). Using the Japanese sort order, these words should be sorted like this:

  • 私立大学 (しりつだいがく)
  • 私(わたし)

A second year Japanese student could figure this out. For a computer, this is a very difficult problem.

Here is another, more extreme example.

There are four Japanese women whose names you have to sort: Junko, Atsuko, Kiyoko, and Akiko. This does not seem difficult, until they each show you how they write their names in kanji:

  • 淳子 (Junko)
  • 淳子 (Atsuko)
  • 淳子 (Kiyoko)
  • 淳子 (Akiko)

As you can see, this is rather troublesome. This comes back to kanji having multiple pronunciations. If this was for an address book of your phone contacts for example, you would want Atsuko and Akiko listed with the A names like Ayumi and Akira. But you would not want Junko and Kiyoko listed there.

And this problem is not limited to names. Regular, everyday words also have multiple pronunciations. For example, 故郷 (ふるさと、こきょう), 上手 (じょうず、じょうて、うわて、かみて…) etc.

So how do we deal with this? They have phones and social networking Web sites in Japan with sorted contact lists, so how can we sort these words properly?

The Wrong Way – Using IME Input

First, let’s look at a good try, but failed attempt at Microsoft to try to solve this problem. What good would Excel be if you could not sort on columns and rows. Microsoft clearly understands the issue with sorting Japanese—they just didn’t think through the solution thoroughly.

What Microsoft does in Excel is to capture the input the user types to get the kanji character. For example, if you typed Junko to get 淳子, it will save that input string as meta data in the background. When it is time to sort, it sorts on the input pronunciation meta data rather than the kanji that are displayed. You can actually see what the meta data looks like in Excel 2003 if you save as XML.

You can see the kanji 淳子 is in two different rows, but the input used to get them was different, Atsuko and Junko, so those are saved as meta data to assist with sorting later on.

The problem with this approach is it doesn’t take into account of how people actually interact with computers using a Japanese IME system. Japanese input works with a dictionary of possible kanji conversions based on what has been input. But not every word or name is in that dictionary. Sometimes you have to type each kanji individually or use a totally different pronunciation to get the kanji you want to show up. This results in the wrong pronunciation being saved as meta data, and sorting will not work as expected.

This system also doesn’t work with cutting and pasting text from other sources, as well as any sort of CSV or database import, etc. This was a good try by Microsoft to solve this problem, but it just doesn’t work.

The Right Way – Ask the User

A computer simply cannot guess the correct pronunciation of kanji, even if it logs the users input, because that might not even be correct. The easiest way to solve this problem is just ask the user for the pronunciation! Most software developed in Japan uses this approach.

Let’s look at this approach done correctly: Amazon.com. Let’s look at their new user registration First, notice the fields in the English version of this screen.

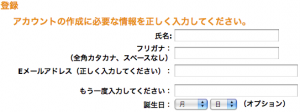
Now look at the Japanese version of this screen.

As you can see, the Japanese version has an extra field. This is for the user to enter the pronunciation of their name in katakana. This way, Amazon has their name in kanji, and the correct pronunciation to go with. They can now sort their user information correctly. This is the approach that most Japanese software takes. It is an extra step, but it solves the problem.

The big takeaway from this is that you cannot just translate software, or even a Web site, and expect it to work. Something as simple as registering a new user has to be completely reworked. In the case of a simple Web site, you will need to redo not only the Web interface, but also the database back end and the code to interface with the database and Web site generation. Localizing a site into Japanese is much more complicated than other languages because of the extra functionality that is required.

While Amazon.com does do the interface and programming localization correct, they do have something on their site that isn’t localized for the Japanese audience: Their logo.

In English, the logo goes with their saying: “Everything from A to Z.” This is indicated by the arrow. But in Japan, and any other country that doesn’t use English, A and Z aren’t always the first and last letters of the alphabet. The A to Z thing works in English because the name Amazon has A and Z in it. But in other countries, they might not have any idea why there is an arrow under the Amazon logo.

Final Thoughts

Sorting in Japanese is hard. Without user input, it is impossible in some contexts to know how to sort some Japanese words. People developing and localizing software need to understand these issues. But regarding the general problem of sorting Japanese when you don’t have user input to give the pronunciation, there may not be a way to automate this until computers can understand language as well as a native Japanese person. For a computer to understand Japanese is far more complex than most other languages. You can see this first hand by using machine translation software and comparing Japanese to something like French.

I think this is an interesting problem. This goes beyond just sorting. How can you expect a machine translation program to work if it doesn’t even know the pronunciation of a word—something that can be key to understanding what that word is. I can imagine even statistical machine translation being confused, especially with names.

Japanese is an interesting language, and processing it with computers is even more interesting.

Japanese Display Menus and Messages in Windows 7

January 31st, 2011

This tutorial will show you how to get Windows 7 to display menus, icons, and messages in Japanese. This is different from Japanese input. For Japanese input please refer to the Japanese Input on Windows 7 tutorial.

There are many steps involved, but you don’t need a Windows install CD like Windows XP required. There are three main steps:

  1. Install Japanese language pack
  2. Set the display language to Japanese
  3. Set additional menus to Japanese

Install Japanese Language Pack

To get Japanese menus, first we need to download the Japanese language pack using Windows Update.

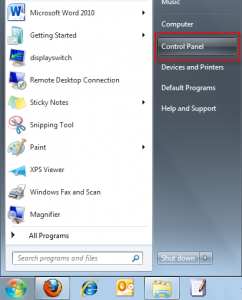
To start, press the Windows button to open the Start menu.

On the Start menu, select Control Panel.

On the Control Panel screen, select System and Security. If you don’t see this option at first, change the View by: option at the top right of the screen to Category.

On the System and Security screen, press Windows Update.

On the Windows Update screen, press Check for updates.

After a few moments, Windows Update will display the updates available for your computer. Select optional updates are available. (If you have important updates, you should also come back and update those when you are finished).

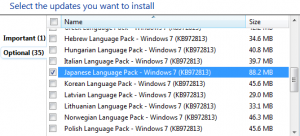
On the Select the updates you want to install screen, you should see Windows 7 Languages Packs under the Optional updates, which appears under the Important updates. Scroll down and select the Japanese Language Pack – Windows 7 optional update and press OK.

On the Windows Update screen, press Install updates to begin installing the Japanese Language Pack.

Wait a few moments while the language pack update downloads.

After the download completes, wait a few moments while the language pack update installs.

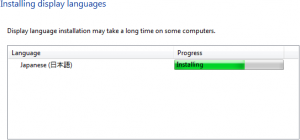
A pop window, the Install or uninstall display languages screen, will show the installation progress. As it notes, display language installation may take a long time on some computers. It took approximately 10 minutes on my Core i5 laptop.

When installation is complete, the Windows Update screen will show a successfully installed message.

Set the Display Language to Japanese

To start, press the Windows button to open the Start menu.

On the Start menu, select Control Panel.

On the Control Panel screen, under Clock, Language, and Region, select Change display language. If you don’t see this option at first, change the View by: option at the top right of the screen to Category.

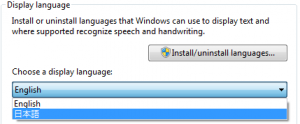
On the Keyboards and Languages tab, click on the Choose a display language drop down menu. You should now have the option for Japanese, displayed as 日本語.

Select 日本語 and press OK.

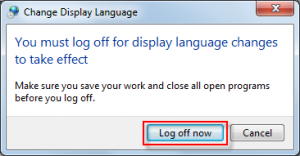
You will be prompted to log off for the display language changes to take effect. Press Log off now.

Windows will log you out. Log back in as you normally do.

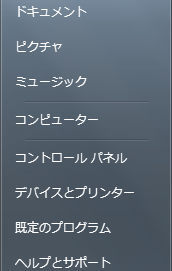
Windows 7 will now display menus, icons, and messages in Japanese.

Some applications, such as Internet Explorer, will automatically change to Japanese display menus. However, some applications may still be in English. You may be able to get these to display in Japanese by changing the Windows region to Japan via the Control Panel, or by changing specific settings within the application itself.

Set Additional Menus to Japanese

As you may have noticed when you logged in, the Welcome screen and message were still in English. To change this to Japanese as well do the following:

On the Start menu, select コントロール パネル (Control Panel).

On the コントロール パネル (Control Panel) screen, under 時計、言語、および地域 (Clock, Language, and Region), select キーボードまたは入力方法の変更 (Change display language). If you don’t see this option at first, change the View by: option at the top right of the screen to カテゴリ (Category).

On the 管理 (Administrative) tab, under the ようこそ画面と新しいユーザー アカウント (Welcome screen and new user accounts) area, press 設定のコピー (Copy settings).

On the ようこそ画面と新しいユーザー アカウント (Welcome screen and new user accounts) dialog box, select ようこそ画面とシステム アカウント (Welcome screen and system accounts) and 新しいユーザーアカウント (New user accounts) and press OK.

You will be prompted to reboot for the changes to take effect. Press 今すぐ再起動 (Restart now).

Windows 7 will restart. When it boots up, the start up, user log in,  and welcome screens will now be in Japanese.

That’s it. Now you have all your Windows 7 menus and messages in Japanese.

Japanese Input on Windows 7

January 20th, 2011

Setting up Japanese input mode on Windows 7 is quick and easy compared to XP. You no longer need a Windows install CD—all of the Japanese fonts are available in the default installation.

This tutorial will show you how to get Japanese input mode set up.
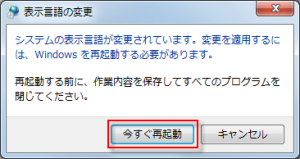
To start, press the Windows button to open the Start menu.
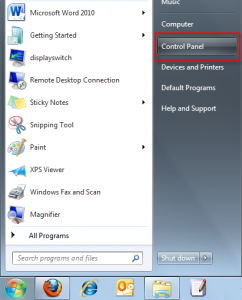
On the Start menu, select Control Panel.

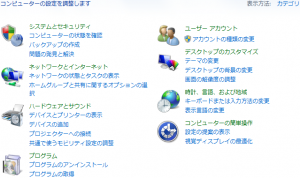
On the Control Panel screen, under Clock, Language, and Region, select Change keyboards or other input methods. If you don’t see this option at first, change the View by: option at the top right of the screen to Category.

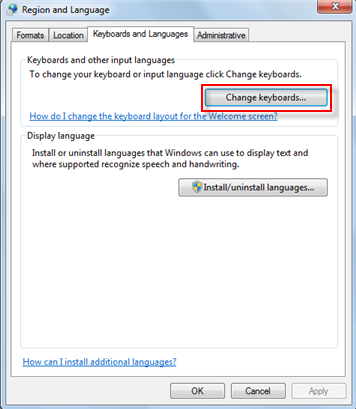
On the Keyboards and Languages tab, press Change keyboards….

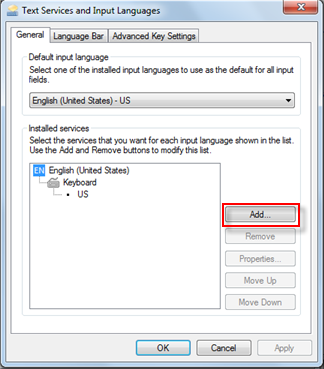
On the Text Services and Input Languages screen, press the Add… button.

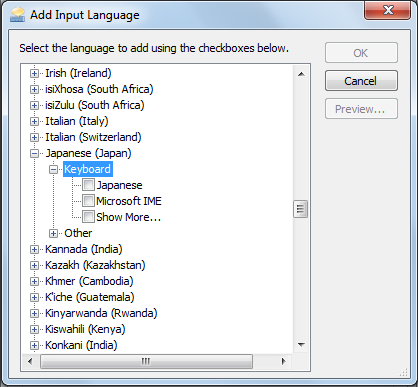
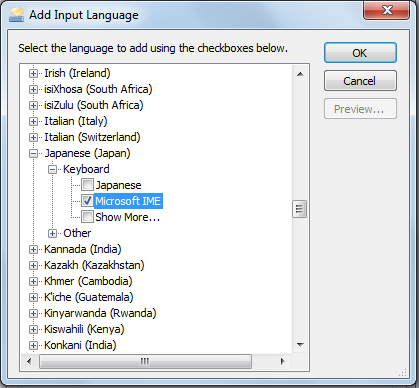
On the Add Input Language screen, scroll down to Japanese (Japan) and expand Keyboard.

Select Microsoft IME.

Press OK and OK on the input language screens and you will now have the Language Bar icon in the notification area of the task bar. EN stands for English

JP stands for Japanese. In Japanese mode you can type in English or Japanese. The A signifies that you are in English mode.

Press the A and select Hiragana to switch to Japanese input. The A changes to a Hiragana .

You can also choose an option to have the language bar display in full on top of the screen.

You should now be able to type in Japanese. Try it out. できましたか?

Windows 7 has the same short cut as XP to switch between English and Japanese input while in Japanese input mode: Alt-~ (Alt + tilde).

Japanese Input on Ubuntu Linux 10.04 LTS Lucid Lynx

June 15th, 2010

The latest release of Ubuntu, 10.04 LTS Lucid Lynx, makes a lot of things easy in Linux. And setting up Ubuntu with a Japanese IME to type in Japanese is as easy as ever. Whether you are a student of Japanese or a native Japanese speaker, you will need to set up Ubuntu to type in Japanese if you are not on a Japanese system.

This simple tutorial will get you set up with a Japanese input method in as few steps as possible.

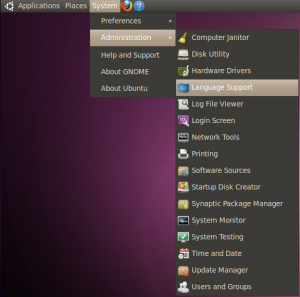
To start, select from the top panel SystemAdministrationLanguage Support

System - Administration - Language Support

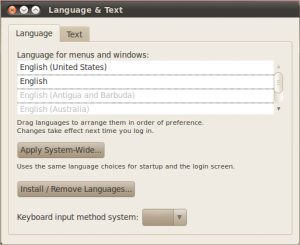
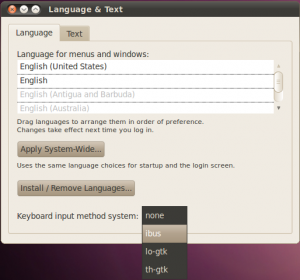
In the Language and Text screen, press the Install / Remove Languages… button.

Language and Text Screen

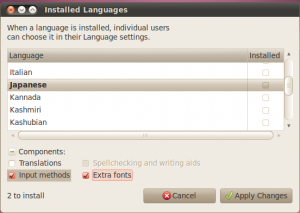
In the Installed Languages screen, scroll down to Japanese and check Input methods and Extra fonts, and press Apply Changes.

Installed Languages Screen

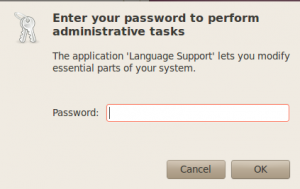
You will be prompted for your administration password.

Administration Password

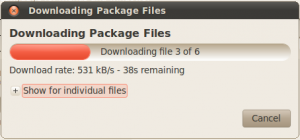
The necessary packages will start downloading.

Downloading Packages

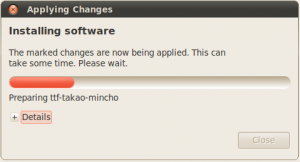
The downloaded packages will be installed automatically.

Installing Software

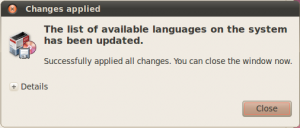
A dialog box confirming the Japanese language packages have been installed will be displayed.

Install Completed

After everything is installed, the next step is the set up the keyboard input method editor.

Select from the top panel SystemAdministrationLanguage Support

In the Language and Text screen, click on the Keyboard method input system dropdown and select ibus.

ibus

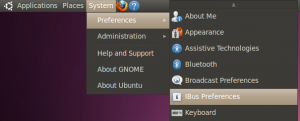
Next, set up ibus by selecting from the top panel SystemPreferences IBus Preferences

IBus Preferences

You may get the following dialog box saying IBus is not started. Press Yes to start it.

Start IBus

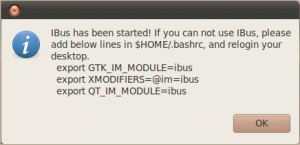
You may also get a dialog box with the following message. Just press OK.

IBus error

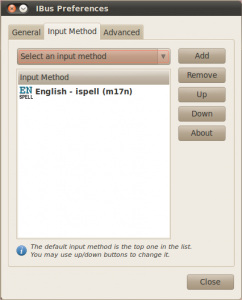
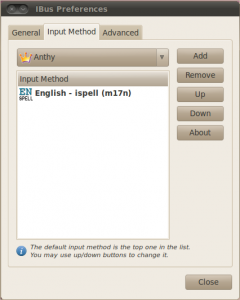
On the IBus Preferences screen, go to the Input Method tab.

IBus Preferences

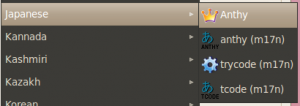
Press the Select an input method dropdown and select JapaneseAnthy.

Japanese - Anthy

Press Add on the IBus Preferences screen to add the Anthy Japanese input method.

Add Anthy

You should now have a little keyboard icon displayed somewhere on the right side of the top panel.

Keyboard Icon

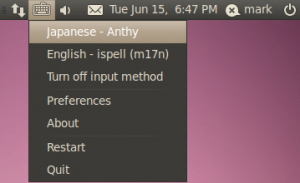
Open a text editor like gedit. While the cursor is in the text field, press the keyboard icon in the top panel and select Japanese – Anthy.

Select Anthy

The Anthy Japanese IME toolbar will appear on your screen.

Anthy toolbar

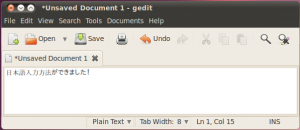
Use the toolbar to toggle the various Japanese input modes. Now you’re ready to type Japanese in Ubuntu!

gedit with Japanese

That wasn’t very difficult. In fact, after you do it on a few machines you can get it all set up in under a few minutes.

There you go. With these steps, you can begin typing Japanese on your Ubuntu Linux system, regardless of what language the OS menus display in.


Japanese Input on Android Phones

February 15th, 2010

With the release of the first Google Android phones in Japan from NTT Docomo, there are finally phones with Google’s native Japanese keyboard input. The keyboard has been in the SDK, but it has not appeared on any handsets in the U.S. yet. I have not been able to find any information about when non-Japanese Android phones will be able to use the Japanese keyboard input.

Until there is a native Japanese keyboard input, the only usable option is the Simeji Japanese keyboard input. Simeji is a Japanese input app that lets you switch input modes on the fly between English and Japanese. It includes multiple Japanese input modes, including the standard keitai-style mode. Under the phone settings you can configure the keyboard to your preferences. I prefer the vibrate on touch option to keep the Japanese input mode feel similar to the default English keyboard on the HTC Hero.

The biggest drawback to Simeji is that it is an app. Since it is not a native part of the OS, it takes time to load every time you toggle the keyboard. There is also some lag when typing at times. It is always running in the background ready to be toggled to, but it never feels like it is a natural part of the phone’s OS.

Another drawback to using Japanese input on Android is that it does not work with text messages. You can input Japanese and sent text messages; you just can’t read any messages you receive. I don’t know if this is a problem with Sprint’s network or American text messages in general, but it is a problem. I can understand an older phone having problems receiving Japanese text messages. But from Android to Android I expect better. Between Android phones you can always use Google Talk, but there is no guarantee that the person you are messaging has notifications turned on for Talk, whereas with text messages that is almost guaranteed.

Simeji works—for the most part—and has lots of configuration options. It is great that someone has created this app because there is a need for it. But the native Android Japanese input keyboard should be made available to all Android phones. The iPhone gets this right; Google should too.

Batch Search and Replace

August 30th, 2008

Batch search and replace across multiple files seems to come up a lot. It’s good to know a quick and simple way to do this on text files.

Problem

Suppose you have 100 XML files and you want to add an attribute to one of the elements.

Current XML: <document author=”mark”>

Desired XML: <document date=”2008-08-08″ author=”mark”>

Any XML or even text editor can do search and replace on this easily through the GUI. But if you have 100 XML files that need the same thing done, you need a quick way to do this in batch.

Solution

We’ll write a shell script to read in all 100 XML files, do a search and replace to add the new attribute, and create a new version of each modified XML file in a new directory.

To run the shells script, you need either:

Here is the batch search and replace shell script:

for x in *.xml;
do
  sed -e 's/<document/<document date="2008-08-08"/g' < $x > tmp/$x;
done

Make sure the directory tmp/ already exits; that is where all your modified files will go.

That’s it. Just a simple for loop and a search and replace command. Next time you need to change something across multiple documents, write a simple script instead of doing it manually.